You probably love spending time in your kitchen. Who wouldn’t want to whip out their grandmother’s vegetable soup recipe, bond with the family and prepare quick, easy meals for busy weeknights? It almost feels like a magical place where your heart and tummy feel full and warm.
But the question is: can you put in the work to keep it squeaky clean? If you’re not exactly a fan of cleaning, you wouldn’t be the biggest fan of this chore. You might even feel tempted to call professional cleaning services and get things over with.
Your kitchen takes a beating, that’s for sure. Get-togethers, huge family gatherings, hurried dinners, what have you. Not to mention spills and crumbs accumulating on surfaces, leaving you clueless about how and where to start.
However, kitchen cleaning becomes a lot more tolerable when you break it down into smaller tasks. That’s why we’ve made the ultimate kitchen cleaning checklist to help you get started and feel that sense of accomplishment!
Continue reading below for basic kitchen cleaning tips and hacks you should consider.
How To Clean A Kitchen: A Step-By-Step Guide

It’s easy to ignore your kitchen for weeks on end. Besides, if you live alone, who cares if you leave your pots and pans uncleaned, your sink unwiped and your appliances on the verge of breaking down?
Believe it when we say you’ll regret it sooner or later. And if you don’t want that overwhelming feeling of having an unmaintained kitchen, take a look at these kitchen cleaning step-by-step guide:
Step 1: Remove The Clutter Off The Counter
This might sound obvious, but you will find kitchen cleaning extremely overwhelming if you don’t declutter your kitchen space. Start by loading dirty dishes into the dishwasher, discard or recycle empty jars and replace the roll of paper towels.
You can also try doing the laundry basket method. You pick up everything that doesn’t belong on the counter and toss it in one place instead of putting items away one by one. That way, you won’t consume half the day getting distracted!
And when the kitchen is completely clean, drop the items where they need to be.
Step 2: Start The Dishwasher And Clean The Sink
Turn the dishwasher on if you have one. But if you’re hand washing, wash the dishes now and stow them away to let them dry. Make sure you clean burnt pans you’ve been putting off for weeks, including the water bottles you abandon on the sink.
Once you’ve cleared the dishes, start cleaning the basin and fixtures of the sink. Of course, the cleaning method will vary depending on the type of sink. If it’s made of porcelain, use warm water and gentle soap to sanitise it.
You can also opt for green cleaning products like vinegar as an alternative like bleach and ammonia. Don’t forget to pour some baking soda powder over the surface to loosen the dirt.
If you notice any remaining stains, use lemon juice and salt, leave it for five minutes and scrub it with a clean cloth or sponge. Just don’t scrub too hard so you don’t scratch the sink!
However, if you have a stainless steel sink, rinse the sink with faucet water to get rid of food particles. Next, coat it with baking soda and scrub in the direction of the steel grain. Be sure to spray on undiluted vinegar and leave it for a few minutes before rinsing.
And if you want to maintain its shiny surface, pour a few drops of olive oil into a lint-free cloth and wipe the sink to your heart’s content.
Step 3: Clean The Kitchen Cabinets
When making a kitchen cleaning routine, homeowners tend to focus on the big three: the sink, counters and floors. They often forget to clean kitchen cabinets, assuming they’re low maintenance and no one would bat an eye if they don’t get too much attention.
But did you know that kitchen cabinets collect dirt, grease and food splatters? Bacteria like Salmonella might even contaminate handles and knobs, posing a serious health risk to your family.
To get started, empty your cabinets in a methodical manner so you can return the items where they belong. Make sure you throw away expired ingredients. Once done, peel off the shelf paper and replace it with a new one.
Use warm water and mild detergent to wipe down the inside of the cabinet. Wipe it dry using a dry cloth to ensure no water is left to damage the cabinet surfaces.
Make sure that you dust your cabinets at least once a week with a dry, soft cloth to lessen the need for deep cleaning!
Step 4: Clean The Stove Top
Some people refuse to include cleaning the stove top in their daily kitchen cleaning, leading to hardened oil and food particles. If you’re one of them, don’t fret! We can work around this with gentle yet thorough scrubbing to finally get rid of that two-week-old gunk.
First, no matter what kind of stovetop you’re using, make sure it’s turned off. If you’ve recently cooked something, wait for it to cool down before wiping down the surface.
Keep in mind that a gas stove typically has four parts you need to clean:
- The grate is the surface where pots and pans are placed when cooking.
- The burning caps are detachable disks that disperse flames from the burners.
- The burner heads are connected to the stovetop. This is where the fire originates.
- The surface of the stovetop itself.
Just a warning: Stoves and their inner parts are extremely intricate. Depending on the model and brand, they vary in how they’re supposed to be cleaned and handled. We highly suggest that you read the owner’s manual first to prevent causing malfunction or hazards in your household.
Grates And Burner Caps
Start your cleanup with the stove grates and burner caps. Lift the grates off the stovetop and remove the burner caps from the burner heads, then place them on your sink. If the grates are too big and your sink is small, you may need to clean them in several batches.
However, if the grates and burners are already clean, apply soap to a non-abrasive sponge so you don’t damage the enamel or coating. Thoroughly wash the grates and burners with the soapy sponge; you may need to rinse and repeat this process as needed.
You know they’re clean when you don’t see any grimy or filmy stains. The texture shouldn’t also feel too greasy or sticky to the touch.
In case they’re heavily soiled (it’s okay, we’ve been there!), start by giving them an initial wash using a soapy sponge. Next, prepare a powerful paste. Mix 1 part vinegar with 2 parts baking soda, and add a few drops of dish soap to create the mixture.
Apply a thick layer of the paste onto the grates and burners and let it sit for about 20 minutes. Clean it off with a soapy sponge and apply some extra effort!
Burner Heads
You probably didn’t clean your gas stove for months. It has come to a point where you can’t even see the burner caps anymore due to the built-up grease. If this sounds familiar to you, the first thing you should do is turn the stove off as a basic precaution.
Find a damp cloth with a damp cloth to get rid of crumbs or debris. Then, use the pointed end of a paper clip or safety pin to carefully scrape away any residue from narrow notches or hard-to-reach areas. Gently poke into the clogged ignition port or burner holes, where the gas is emitted.
Wipe it with a damp cloth again to remove any loosened grime. And to strip off grease and stains, apply vinegar to a cloth and scrub the burner heads.
Gas Stovetop Surface
Begin by using a damp cloth to wipe down the surface of your stove to collect food particles. Next, use a non-abrasive soapy sponge to wash the stovetop and remove any greasy spots. But if the stubborn grease has solidified, use the vinegar-baking soda mixture we’ve mentioned and let it sit for 10 to 15 minutes.
Once you’re done cleaning, dry the surface with a clean cloth. Don’t forget to place the burner heads and the grates where they belong!
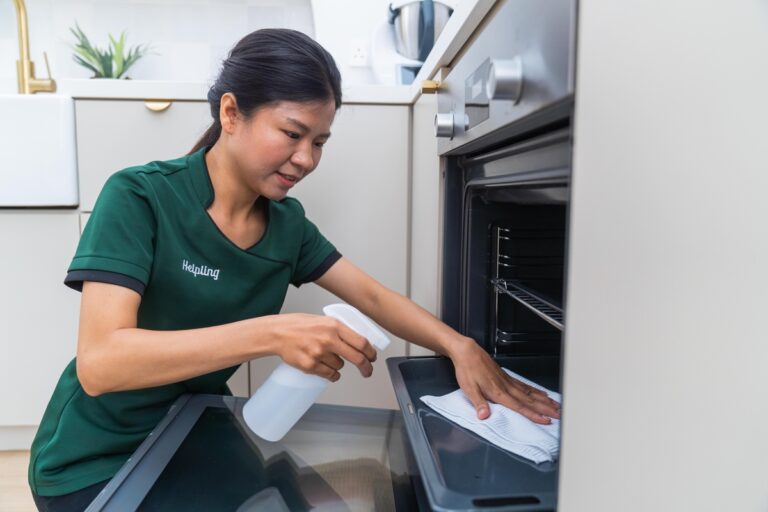
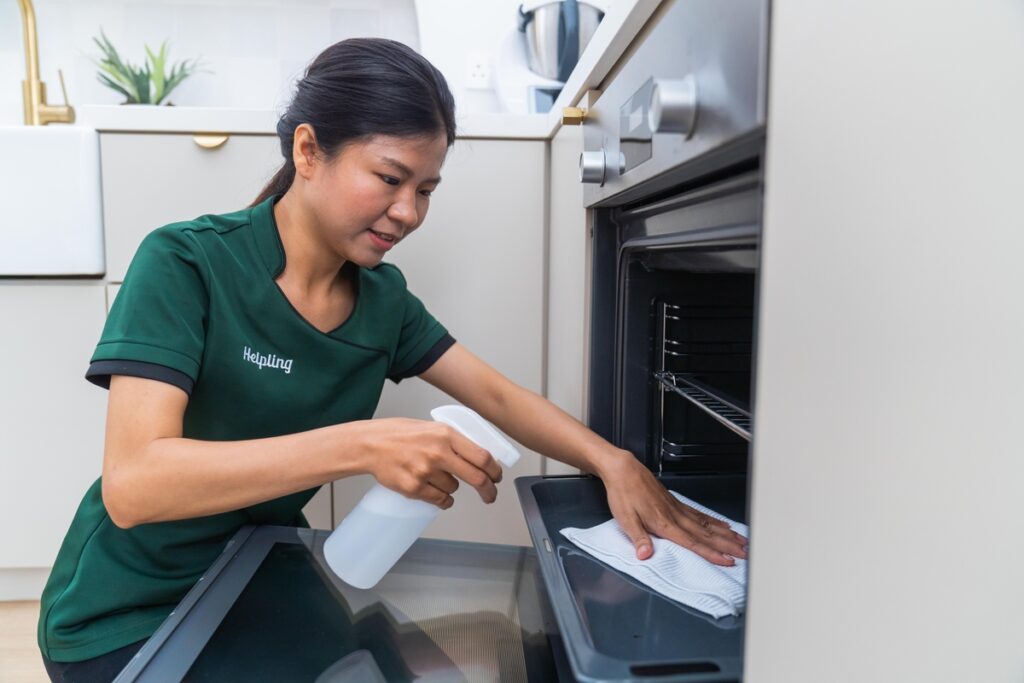
Step 5: Clean Your Oven
Just like your kitchen cabinets, it’s super easy to ignore the oven. Simply close the door—and voila—you don’t have to worry about it anymore. Out of sight, out of mind.
And just like that, you don’t notice that your oven has turned into a culinary crime scene. Layers of hard-baked grease and grime are now a huge problem, making it harder to complete your kitchen cleaning checklist.
Don’t get tempted to use all-in-one oven cleaners that you leave inside the appliance overnight. It’s quick and easy, yes, but the chemical fumes that come with them aren’t worth it. Let’s take a more natural approach to cleaning your oven and start by switching it off.
To begin, follow these simple steps:
- To clean its interior, mix half a cup of baking soda and two to three tablespoons of water for the paste.
- Then, apply the paste to areas with grease and stains. Allow the paste to sit overnight to loosen the grime and residue.
- The next day, take a microfibre cloth and dampen it with water & distilled white vinegar.
- Use the cloth to wipe away the baking soda paste. Gently scrub the interior as needed to remove any remaining dirt.
- Rinse the cloth frequently and continue wiping to remove baking soda residue.
- Once the interior is clean, give it a final shine by wiping it with a dry microfiber cloth.
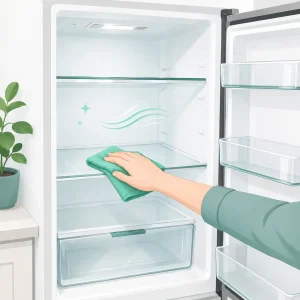
Step 6: Clean The Fridge
If you’re at this step, you’re likely heaving a big sigh like any other homeowner. Cleaning the fridge isn’t exactly the most exciting part of this cleaning routine, but you have to tick it off the list since it’s the workhorse of your kitchen.
Before you get started, empty everything out of your fridge. Throw away expired food items and dispose of anything that appears to be spoiled. Collect the edible contents on your clean countertops to keep track of everything that needs to be put back inside the fridge.
Remove the detachable trays, drawers and shelves from the fridge and soak them in a basin filled with warm, soapy water. Then, use a hot, damp microfiber cloth to clean the interior of the fridge, including the walls and door. Allow the surfaces to air-dry.
Once you’re done soaking the trays and drawers, rinse them and dry them completely before putting them back. Also, wipe down the exterior of the fridge to get rid of dirt and smudges.
Step 7: Empty And Clean Your Garbage Can
If you notice that your garbage can is starting to fill to the brim, this is the best time to take it out. You don’t want unpleasant smells sticking to your walls and spoiling your prepared-with-love meals!
Turn the garbage can upside down to empty out loose or wayward trash. If the inside of the can has an unbearable stink, give it a thorough rinse with hot water while scrubbing it with a bristly brush. This will remove stubborn residue or grime.
But if it’s not bad, you can use an all-purpose cleaner instead to clean the interior and exterior of the can.
Be sure to clean the lid, hinges and foot pedal as well to ensure a thorough cleaning. To wrap things up, put in a new liner once the garbage can is completely dry.
Step 8: Clean The Floor
All the dust and crumbs have likely landed on your kitchen floor, so grab the vacuum cleaner, a broom and a mop to get rid of them once and for all.
First, sweep the floor with a broom to collect bigger crumbs and debris, especially under the fridge and oven. After sweeping, use a vacuum cleaner with a hose attachment. Run it along the baseboards, behind the fridge and other hard-to-reach surfaces.
We also recommend that you get a good microfiber mop and the right cleaner for your floor type. For example, if you have a hardwood floor, it’s best to use mild dish soap and cleaning clothes.
Step 9: Add Finishing Touches And Admire Your Work
If your kitchen is squeaky clean from left to right, take a moment to make a list of items you’re running low on. This can mean restocking kitchen essentials like sandwich bags, sponges, rags, paper towels and coffee filters, among other things.
Moreover, don’t forget to give your kitchen one last look to make sure everything has been cleaned. Ensure you don’t miss anything. If you’re confident enough, you can now put away your cleaning tools and cleaners in the drawer.
You can even light a scented candle or put flowers on the table to make the kitchen even more pristine! Take a step back and admire your work. And while you’re at it, open a can of soda as a way to pat yourself on the back.
How Often Should You Do Kitchen Cleaning?
When it comes to kitchen cleaning, how often is enough? How do you make it manageable so you don’t end up deep cleaning the kitchen every time? Even if we mostly use our sense of sight and smell to dictate our cleaning routines, there are basic rules we need to follow when cleaning the kitchen.
Keep in mind that there are some spots that require extra attention. Here are some typical suggestions recommended by the experts:
- Daily Kitchen Cleaning Checklist
- Wash the dishes.
- Clean the sink
- Empty and clean the dishwasher.
- Wipe and sanitise countertops and stovetops.
- Sweep the floor.
- Weekly Kitchen Cleaning Checklist
- Take inventory of food leftovers and dispose of anything that’s already spoiled.
- Clean the exterior of your appliances.
- Clean the inside and outside of your oven.
- Clean your kitchen cabinets to get rid of smudge marks.
- Sanitise sponges.
- Disinfect sink and faucets.
- Take out the trash and clean the garbage can if necessary.
- Monthly Kitchen Cleaning Checklist
- Check expiration dates. Make sure to get rid of food items that have been unopened for too long since they can attract pests and bacteria.
- Clean your refrigerator.
- Clean and organise kitchen cabinets and drawers.
- Remove tile grout.
- Wash kitchen rugs.
- Clean walls, floorboards and light fixtures.
Calling Professional Cleaning Services To Do Kitchen Cleaning
Not everyone has the privilege of cleaning their kitchens properly, much less keeping the entire house tidy. For example, spending time on housework when working from home might seem a bit impossible. On top of that, you have to take care of the family, so where are you supposed to squeeze kitchen cleaning on your tight schedule?
There’s no shame in asking for help when life gets overwhelming. The good news is, you can now hire professional home services to take household chores off your hands. Take a look at these cleaning services from Helpling:
The Services And Their Cost
As a cleaning service provider in Singapore, we offer a wide range of services, depending on their customers’ needs. And in terms of kitchen cleaning, here are the services and their prices you should consider:
General Cleaning

Our general cleaning services come with a comprehensive all-in-one home cleaning solution that includes:
- Surface disinfection
- Bathroom cleaning
- Kitchen cleaning
- Regular dusting
- Rubbish removal
- Bedroom cleaning
- Vacuuming and mopping
What’s more, your kitchen will be handled by hotel-trained housekeepers with over three years of hospitality experience. You can prioritise other aspects of your life while staying relieved that your home is being handled with utmost care.
Here are the rates for your reference:
| Cleaning Type | Rates |
| Weekly/Fortnightly | S$25 per hour |
| One-off | S$28 per hour |
Moving In/Out Cleaning

If you want specialised cleaning before you hand over your apartment to someone else or move into a new home, moving in/out cleaning services are your best option.
Housekeepers will follow a 50-point checklist to make sure every nook and cranny is cleaned. They’d also focus on kitchen cleaning tasks such as:
- Wiping down surfaces,
- Cleaning kitchen appliances like refrigerators and microwaves
- Disposing of garbage bags
- Vacuuming and mopping the floor area
If you’re considering booking a cleaning, take a look at these rates:
| Apartment Size | Price |
| Less than 500 sqft | S$250 |
| 501-750 sqft | S$300 |
| 751-1000 sqft | S$350 |
| 1001-1300 sqft | S$400 |
| 1301-1600 sqft | S$500 |
| 1601-2000 sqft | S$640 |
| 2001-2500 sqft | S$750 |
| 2501-3000 sqft | S$910 |
| 3001-3500 sqft | S$1,070 |
| 3501-4000 sqft | S$1,230 |
| 4001-4500 sqft | S$1,390 |
| 4501-5000 sqft | S$1,550 |
Spring Cleaning

Spring cleaning services are the most ideal option if you want to declutter your home and give your space a fresh start every quarter. Just like the moving in/out cleaning services, it also follows a 50-point cleaning checklist to cover your kitchen, living room, bathrooms, bedrooms and other services.
Check out their spring cleaning rates:
| Apartment Size | Price |
| Less than 500 sqft | S$300 |
| 501-750 sqft | S$350 |
| 751-1000 sqft | S$400 |
| 1001-1300 sqft | S$450 |
| 1301-1600 sqft | S$550 |
| 1601-2000 sqft | S$650 |
| 2001-2500 sqft | S$700 |
| 2501-3000 sqft | S$850 |
| 3001-3500 sqft | S$1,000 |
| 3501-4000 sqft | S$1,150 |
| 4001-4500 sqft | S$1,300 |
| 4501-5000 sqft | S$1,450 |
Final Thoughts
Kitchen cleaning doesn’t always have to be anxiety-inducing housework. You don’t have to make everything ultra-complicated by doing things all at once, accomplishing tasks in a day and panicking over the smallest stain you find.
Take it one step at a time. Break it down into smaller tasks to avoid getting too overwhelmed and make kitchen cleaning a collaborative effort if you live with someone. Put on some music, listen to podcasts, drink soda—whatever it takes to help you tick off everything on your list.
And if you ever need a hand in cleaning your kitchen and bringing it back to its old glory, Helpling is here to help. We are a digital-first organisation known for efficiency, good service and top-notch professional home services.
Get in touch with us today and book a cleaning. We’ll be right at your doorstep.
FAQs
What are the 9 steps in kitchen cleaning?
To start kitchen cleaning, here are the nine steps you should follow:
- Declutter your kitchen space.
- Start the dishwasher and clean the sink.
- Clean the kitchen cabinets.
- Clean the stovetop.
- Clean your oven.
- Clean the fridge.
- Empty and clean the trash bin.
- Sweep, vacuum and mop the floor.
- Add your finishing touches.
When do I call professional cleaning services to clean my kitchen?
The best time to call professional home services for kitchen cleaning is when you’re overwhelmed with your job and family duties. You can leave the task to well-trained housekeepers that will handle your living space with care and efficiency.
Or maybe you just want to spend your hard-earned rest days going out instead of doing housework. Whatever the situation, cleaning services are within your reach.